
If you recall where I left off in Part 1 of this series, I had the FT-891 mounted on a piece of aluminum sheeting which I had planned to use as a common ground for the radio body and anything else that gets added on, if anything gets added on at all over time. The aluminum sheet was cheap and I figured why not. If nothing else, it at least provides a sturdy and stable mounting solution for the radio as it has been located within the trunk of the car. I then used Yaesu’s YSK-891 separation kit to bring the control head and radio connectivity into the cabin of the car. I power the radio not from the car’s battery but from my LiFePO4 20Ah POTA battery, which is comfortable being placed in a secure nook along the side of the trunk when in use and in transit.
With the hard part out of the way, I had a decision to make for mounting the ATAS-120a on this car. I drive a 2017 Buick Regal which has few straight edges anywhere on the body. This added a small bit of frustration when I was searching for where to place the antenna. With the radio body being located within the trunk, it made sense to also install the ATAS-120a nearby. The problem there was that the trunk lid has zero straight edges, and is rather small in comparison to some sedan trunk lids. I ended up going with the Diamond K400C, which differs from the K400S in that the “C” variant has a shorter length of coaxial cable attached to the antenna mount. Since the antenna and radio would be near one another, this made the most sense.
The K400 is a lip mount that is meant to slide securely onto the edge of a metal body panel of a vehicle. The mounting portion is flexible in that, with a quick loosening of a bolt, one can arrange the orientation of the antenna mount in just about any configuration that would be needed. This means the K400 can be mounted on a flat hood or even the edge of a door, while keeping the antenna itself vertical.
The mount itself is secured onto the edge of whichever body panel you choose by tightening four small set screws on the underside of the lip mount. When researching this mount, it appears that earlier versions required these set screws to be in physical contact with the metal of the body panel where you’d mounted the K400. The newer version includes an aluminum bar that, I guess, helps to ensure all four set screws are electrically connected to the body panel and also to help provide a sturdier clamp onto the body panel lip. For my installation, there was some sort of sealant that had been applied along the bottom edge of the trunk lid all the way around. This made the lip of the trunk lid too thick for the K400 to squeeze onto it. I took a hobby knife and cut just enough of this sealant way so that I could get the mount placed where I wanted it. I was worried about this for two reasons–the sealant appears to be there to ensure moisture doesn’t get into the seam where the top and bottom parts of the trunk lid come together. I guess there’s a layer of sheet metal on top of the lid that is folded over along the edges and then sealed. As such, I tried my best to expose a sufficient amount of metal that could make contact with the aluminum bar of the K400 while leaving enough sealant to keep the seam water-tight. I’d rather not cause unnecessary rust if I can help it.
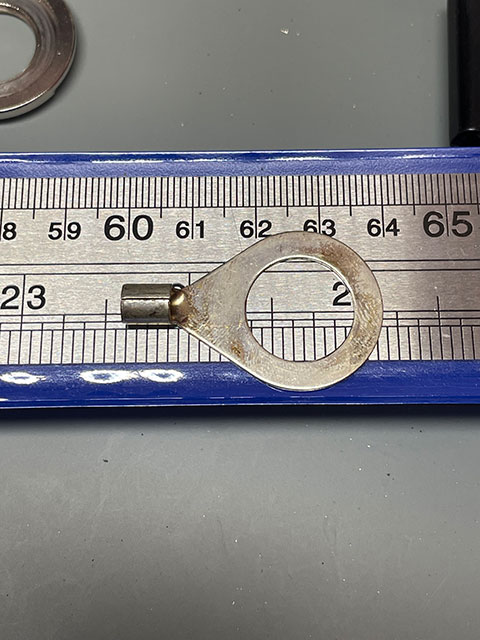
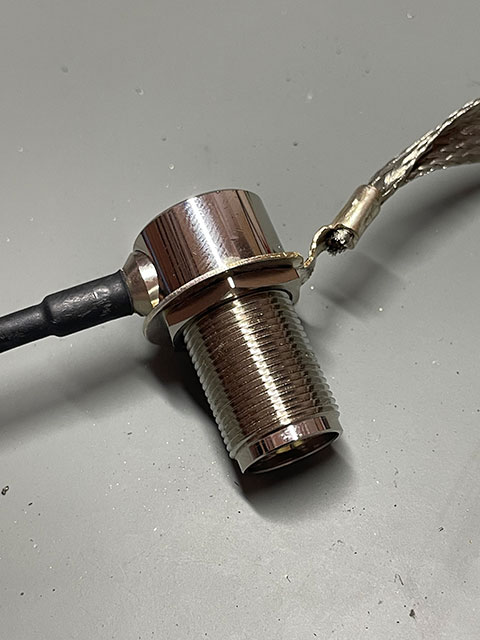
During related research on usage of the ATAS-120a, I learned that it is best to bond your antenna mount to the vehicle’s body panel(s). Research indicated that a good bond needed to be made and so during a GigaParts Let’s Make A Deal events in December, I purchased some tinned, 1″ wide by 5′ long bonding straps. Knowing that bonding and grounding straps should be as short as possible, I cut a short length of strap and connected one end to a large ring terminal and slid that up in between the SO-239 connector and the K400 mount. I used a wire brush at the end of a cordless drill to clean up the underside of the K400 mount to ensure good continuity.
The ring terminal I used to connect the bonding strap to the K400 mount was one big enough to fit over the SO-239 connector on the mount. I had to modify it a bit so that it would fit into the mount the way I wanted.
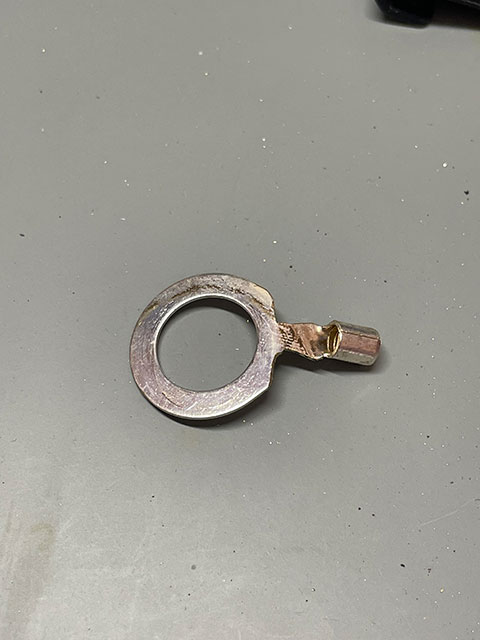
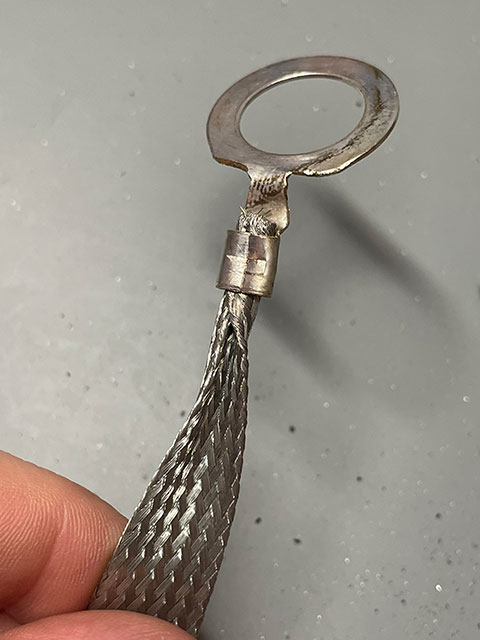
After dry-fitting, I attached the bonding strap to the ring terminal and installed the SO-239 back into the K400.


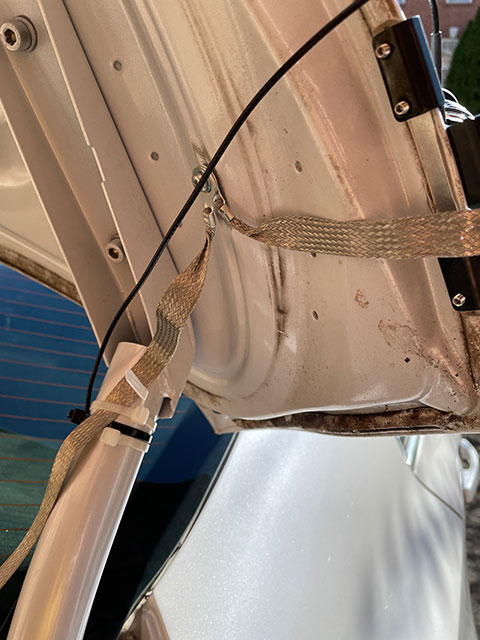
I then attached the other end of the bonding strap to a hole I poked in the underside of the trunk lid and had hoped that was all the effort I needed to exert and that I could power up the FT-891 and tune the ATAS-120a to near 1:1 across 40 through 10. But as things tend to happen, this was not the case. I could get a good match on 40, 30, 20, 17, 12, and 10 out of the box. When trying to tune 15 meters, the radio would raise or lower the ATAS one full cycle (all the way up and all the way down) and then lose its marbles. As you watch the control head’s display, you can see the SWR meter as the antenna gets close to a good match. For 15 meters, the SWR would come down to around 2:1 but the radio was not happy with that and thought it could do better but failed. Once it realizes it can’t do any better, instead of going back to the 2:1 match, it just stops doing anything at all and seemingly locks up the radio for a short spell. The ATS icon will continuously flash, which should indicate active tuning of the antenna, but the antenna is not moving at this point and you cannot turn the tuning activity off. The only course of action at this point is to wait it out. Once you see the ATS icon on the LCD screen stop blinking, you can then move to another band and tune up there. You’ll notice that the ATAS will have to get its bearings back on track before it actually does anything again, but I implore you to be patient with it. It’s not broken, it just needs time.
So, this was my first real major hurdle to cross in this installation. 15 is a pretty good band most of the time and I wanted to find out why I could not tune it down to an SWR that my radio would like. My first assumption was that maybe there was just too much QRM where I did my initial testing (in my driveway with the antenna literally three feet from the side of the house) so I tested tuning 15 meters again when I went out to activate a POTA park. I still could not tune to a low enough SWR for the radio to not lose its mind! My second assumption, then, was that I needed more bonding.
In between that first bit of installation and now we had a major snowstorm, major thunderstorms, high winds, lots of rain, etc. so the work got postponed several times. Luckily, we had a bit of a break in the weather which afforded me enough time to hunt for a second bonding point for the antenna. Using a multimeter, I was able to determine that I had good continuity between the base of the antenna and the trunk lid. So I assumed that maybe the trunk lid just wasn’t provide a sufficient ground plane and therefore I needed to add to that by bonding the trunk lid to another panel of the car. After pulling away a few panels inside the trunk in a hunt to find a suitable metal on metal bonding point, I came across a grounding post used by another electrical component stuffed behind the passenger rear quarter panel. I don’t know what the component is or what it does, but I’m not connected directly to it, just using the same ground point that it already uses. Seems safe enough for me.
After battening down all the trunk panels again and tidying the bonding strap up so that it could not kink up when the trunk was closed, I attached the ATAS-120a to its mount, provided power to the radio, and tried to tune across the bands. 40 tuned up quickly and with a low SWR, a great start! 30 was good. 20 too. 17 was fine. Then 15 meters. I pressed the TNR quick menu button on the radio and crossed my fingers that I’d successfully conquered this roadblock. Sure enough, the radio got a great match on 15! 12 and 10 tuned up great as well.
I managed to get all of this figured out and solved just in time for a major geomagnetic storm to wipe out all of the ham radio fun for the weekend, so I parked the car and will just have to put the antenna through its paces sometime soon, weather be damned!
That’s all she wrote folks.
73,
Matthew, K2MAS
As a member of Amazon’s Associate program, I earn a small commission on qualifying purchases made through referrals. This helps offset the costs of hosting this website and are greatly appreciated.
