
I’ve owned my Yaesu FT-891 for several years now and while it’s a great radio, it had taken on the job of protecting my shelf from dust while I used other radios such as the Yaesu FT-710 and the Elecraft KX3 instead.
As I got more involved with the Amateur Radio hobby over the last year or so, I thought I’d try installing the FT-891 into my car so that I could operate mobile. The FT-891 is designed as a mobile HF radio anyway. I might as well use it for its intended purpose. This is especially useful since it’s currently still Winter here in the northern hemisphere I’ve not done any POTA park activations since November because I’m a bit reluctant to freeze my butt cheeks to picnic benches. Putting an HF station into my car is the perfect solution for Winter operating. At the rate things are going, though, it’ll most likely be Spring before I get everything sorted out the way I want it.
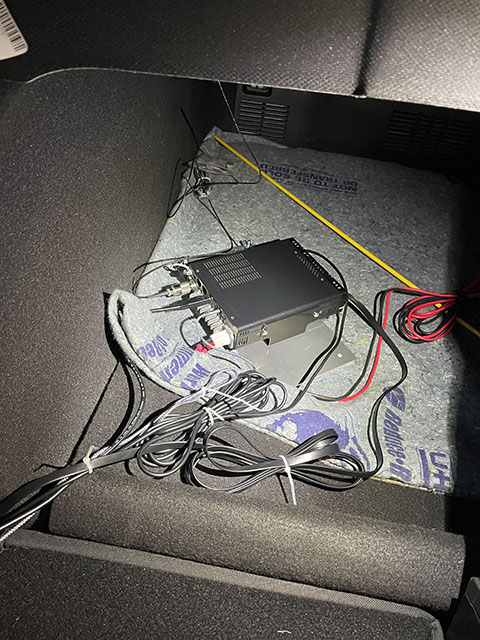
For this installation, I went the traditional route and paired the FT-891 to an ATAS-120a antenna. The ATAS-120a is mounted on a Diamond K400C lip mount installed on my trunk lid. The K400C mount includes an SO-239 connector with attached RG-316 coax, which feeds into the back of the FT-891, which is installed in the trunk on a custom aluminum ground plane. The ground plane was an idea I got from an old QST article. Using the Yaesu YSK-891 separation kit, I’ve extended the KEY and ACC jacks into the cabin as well as the control head cable and hand microphone cable. To bring the audio into the cabin, I’m using a TRS-M to TRS-M cable which is plugged into the stereo headphone jack on the side of the control head on one end and into the AUX port in my car’s console at the other. This allows me to send audio through my car’s entertainment system. My plan is to also use a pair of simple earphones plugged into the control head when I feel like using those instead. This is mostly because I seem to have some trouble with echoing inside the cabin when working CW and I find that distracting.
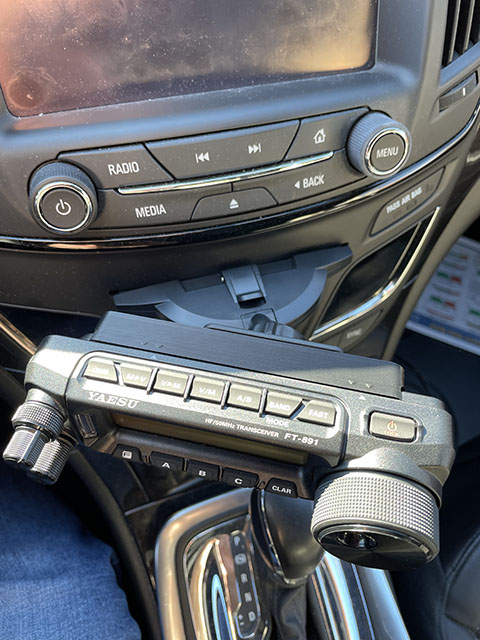
One of my goals for this installation was to not drill any holes into any part of the car’s interior. This was one of the primary reasons for placing the radio body in the trunk and only bringing the connections and control head into the cabin. To mount the control head, I tried several different options until I found one that worked in my car. At first, I tried a seat bolt mount from LIDO Mounts, but then realized that my car’s seats don’t have traditional seat bolts. Since my seats sit on rails instead, I then bought a set of RAM mounting components, which ended up being too large for this application. I then went back to LIDO and ordered their CD player mount, which was my last resort option. It’s actually not that bad of a mounting solution after all.
Once I figured out how I was going to mount the FT-891 control head, I was ready to get started with the project. The first thing I tackled was mounting the radio body onto a custom aluminum ground plane. I used a 1/8th inch thick sheet of aluminum 6 x 12 inches in size. I ended up mounting the radio body perpendicular to the long edge of the ground plane which affords a few inches either side of the radio for making connections to the radio and other pieces of equipment that may eventually be added to the system. For now, it’s just for the radio, but the ground plane also serves as a way to keep the radio from sliding all over the trunk as I get from point A to point B.
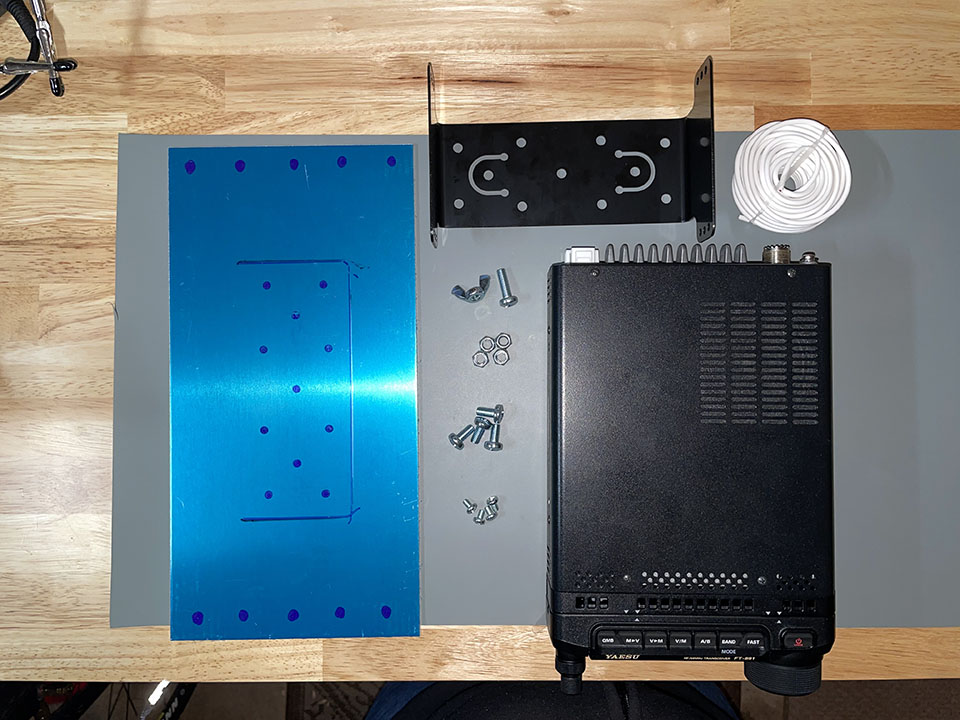
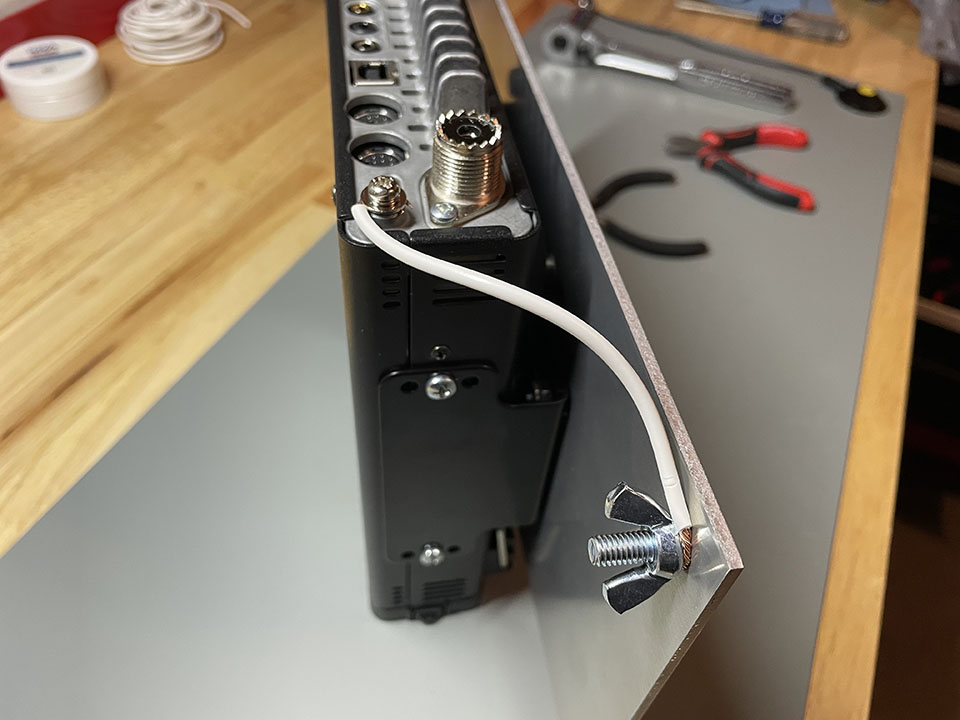
Using a 1/4 inch drill bit, I drilled several holes around the perimeter of the aluminum sheet and four more near the center. The center holes were matched up to the FT-891 mounting bracket, which I attached using M6-1.00 x 12mm pan head screws with matching nuts. After mounting the bracket, I then used four M4-0.7 x 6mm pan head screws to mount the FT-891 body to the bracket. Another added benefit of using the aluminum sheet and the mounting bracket is that it keeps good airflow on all sides of the radio. In one corner of the sheet, using one of the holes I drilled, I ran a single M6-1.00 x 20mm pan head screw from the underside of the aluminum sheet and spun a wing nut on the top side. This connection point is used to attach a short length of wire between the radio’s ground screw and the aluminum ground plane.
Next up was a dry fit to figure out how I wanted to route cabling into the cabin of the car. Placing the radio and its new ground plane into the trunk of the car, I used the relocation cables that come with the YSK-891 separate kit to extend the control head and microphone connectors into position near the center console near the front of the cabin. I used a USB-A to USB-B, which is not included in the YSK-891 kit to bring the USB port on the radio into the cable also so I am able to retain CAT control of the radio from my laptop. I extended the key jack on the radio into the cabin using a 10ft TRS-M to TRS-F cable. This allows me to use every CW key I own as easily as connecting it to the female end of the cable.
I had to buy a FT-891 control head mounting bracket since I did not have one that would work with the LIDO CD mount. I found an excellent solution on Etsy. The bracket was connected to the LIDO mount which was secure within the CD tray of my car’s entertainment system. Easy peasy.
If I scoot my driver’s seat back a bit, I can use a nifty steering wheel tray to support my laptop. The tray has pull-out extensions on either side which are perfect for placing a CW key.
Here is the components listing for what has been installed so far.
Components List
- Diamond K400C lip mount
- Yaesu YSK-891 separation kit
- USB-A to USB-B cable
- TRS-M to TRS-F 10ft extension
- Aluminum sheet
- Steering wheel laptop tray
- Yaesu FT-891 mobile mounting bracket
- M4-1.00 x 6mm screws (FT-891 bracket mounting screws)
- M6-1.00 x 12mm screws
- M6-1.00 x 20mm screws
- M6-1.00 wing nuts
- M6-1.00 hex lock nuts
- 1/4″ drill bit
- LIDO CD player mount
- FT-891 control head bracket
Stay tuned for the next part of this series.
73,
Matthew, K2MAS
