Like many people before me, I purchased the QRP Labs QMX transceiver and waited a month or more for it to arrive. And like maybe a few people, I immediately tried to get the little radio set up to operate on the HF digital modes. I successfully managed to connect and configure everything needed to make my first QSO with the QMX with relative ease.
In this post, I’ll document the items I am using, the process of connecting it all together, and lastly, how to configure the WSJT-X settings to get your signal on the air and to decode other hams’ signals. Follow along if that’s something you’d like to get figured out yourself.
Kit Components
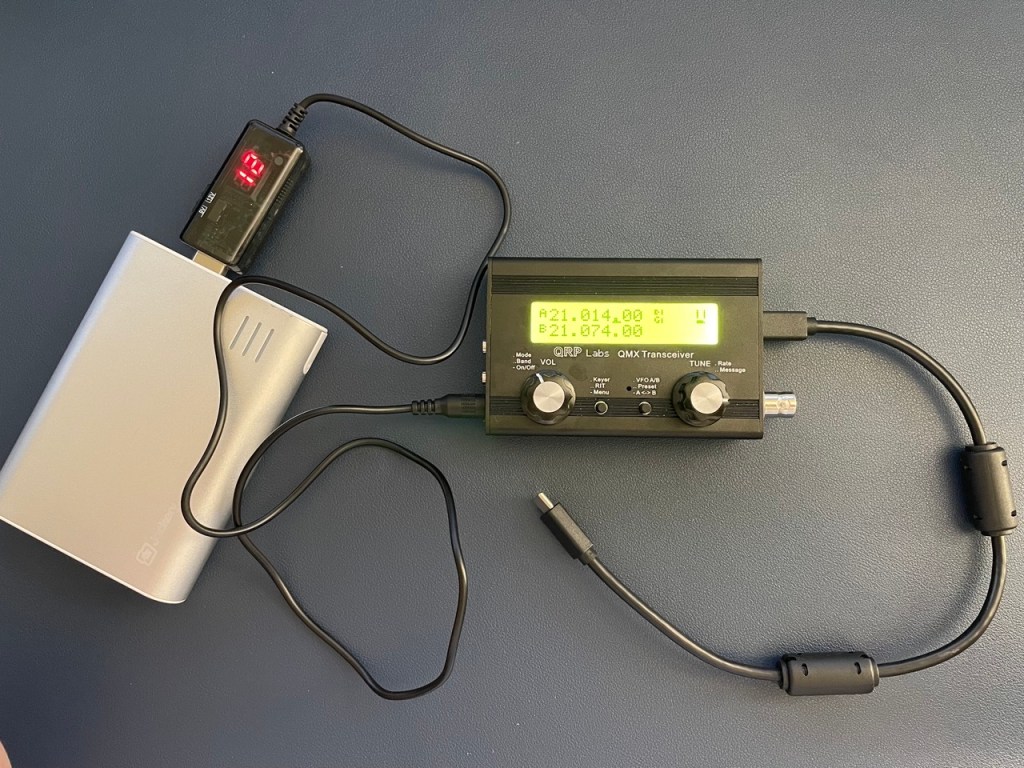
- Apple MacBook Pro M2 16″
- QRP Labs QMX Multi-Band QRP Tranceiver (factory assembled, configured for 12V power supply)
- Digirig Short USB-C to USB-C cable
- 12,000 mAh 5V 1A rechargeable battery pack
- USB 5V to 9V/12V Step-Up Converter
- WSJT-X software
Connecting everything together
The QMX has a built-in sound card which makes connecting it to a computer to operate on the HF digital modes fairly simple and straightforward. The connection between the QMX and your computer is over a USB-C cable. Since my MacBook Pro has several USB-C ports, I used the short USB-C to USB-C cable from Digirig which comes with two preinstalled ferrite chokes. Use whatever cable facilitates the connection from the USB-C port on the QMX to a USB port on your computer.
Messing around with the software settings
I’ll leave you to your own efforts with installing any prerequisite software on your computer needed to use the QMX and WSJT-X. The QMX has an internal sound card that should be readily recognized by your computer, so no third party drivers should be necessary. Really, the only prerequisite software you’ll need is WSJT-X.
We’ll start with the few QMX configuration settings that are pertinent to operating on the HF digital modes. Confirm the following settings are configured with the values shown below and accept the defaults for all others not listed. You can also read through chapter 6 of the QMX operating manual which also covers this process. Set the following menu options by entering the Menu, and then entering the Digi submenu.
- VOX = Off
- Sideband = USB
In the CW menu, navigate to the CW Keyer submenu and make sure that Practice Mode is set to Off. Otherwise, your QMX will not send a signal onto the wire.
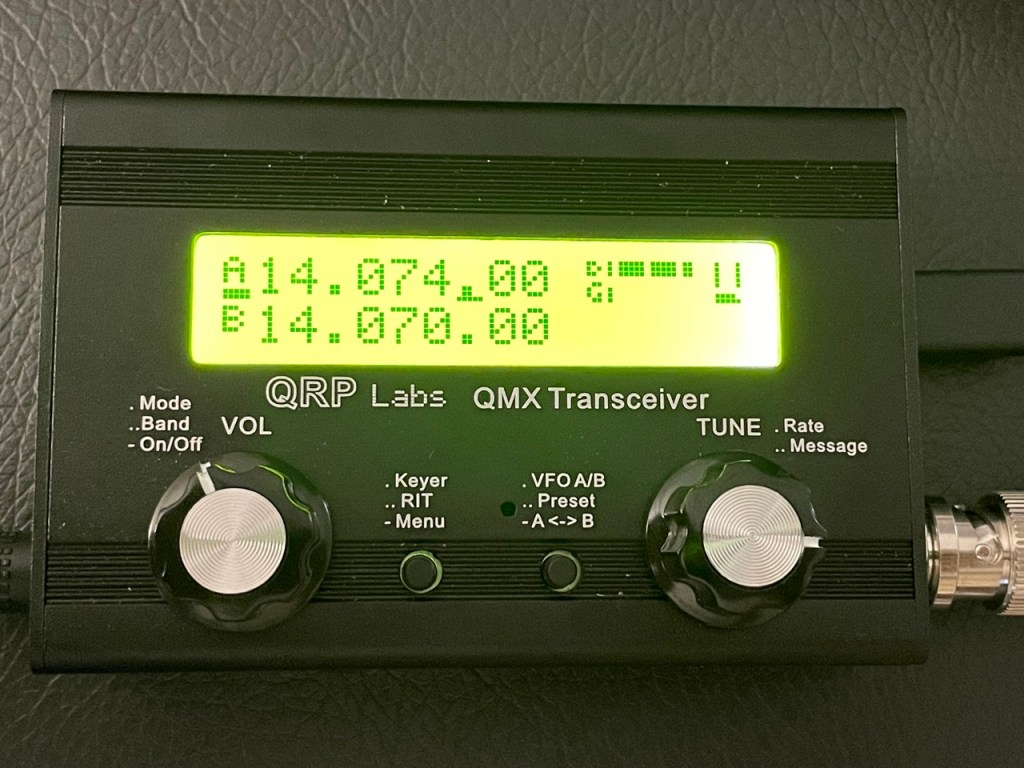
Give the VOL knob a short-press to ensure you are in the Digi operating mode and that should just about cover it for configuring the QMX itself for HF digital mode operation.
Make sure that you have your QMX wired up, powered on, and connected to your computer. Once that is completed, launch WSJT-X. Enter the Settings menu for WSJT-X and navigate to the Audio tab. The first thing we want to do is set the Input and Output audio source to be the USB device that is the QMX. The way this appears will be different depending on which operating system you use on your computer. As audio settings can be very unique for each computer and operating system, I am unable to provide guidance on those in this article. The examples here are from macOS.

Next, navigate to the Radio tab. Configure the following settings either by entering a drop-down menu, selecting a radio button, or checking a box.
- Radio = Kenwood TS-480
- Serial Port = /dev/tty.usbmodem2101 (This will differ for all users for the most part. It’s dependent on your operating system. Select the appropriate value for your situation)
- Baud Rate = 38400 (the QMX guide states that this is an irrelevant setting, though).
- Data Bits = Eight
- Stop Bits = One
- Handshake = None
- PTT Method = CAT
- Mode = None
- Split Operation = None
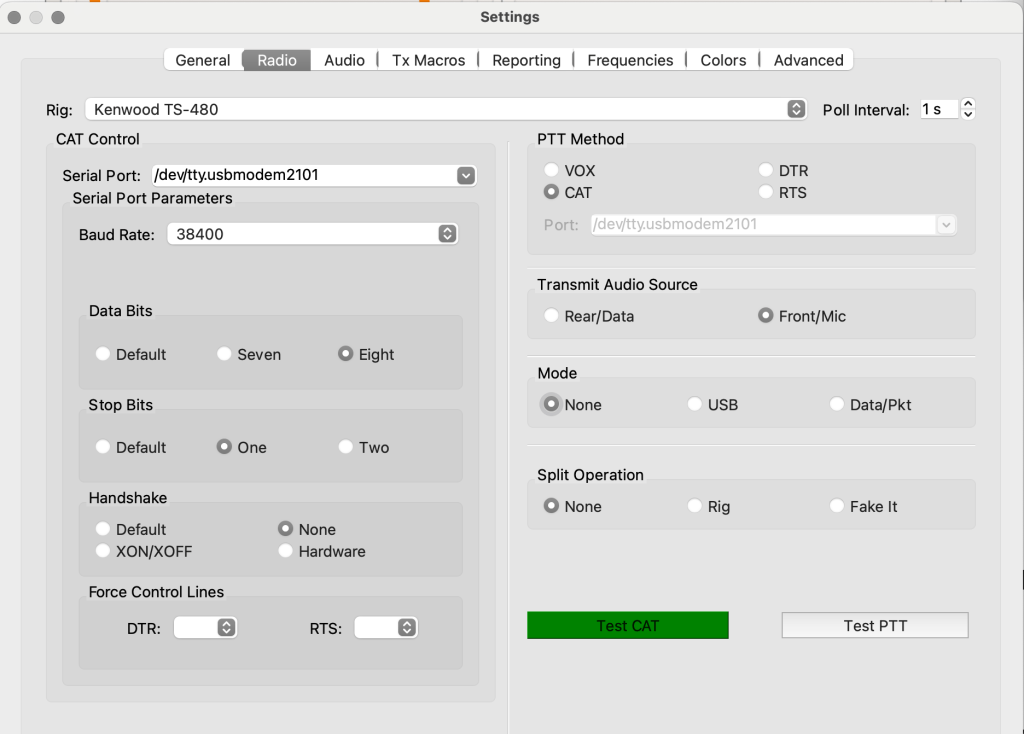
Once you have those settings configured, click the Test CAT button and hopefully it will turn green, suggesting that your WSJT-X application will be able to successfully control your QMX. If you’re good so far, go ahead and click Test PTT as well and if the button turns red in the WSJT-X settings window and you see the Transmit bar on your QMX show up, then you should be ready to save your settings by clicking OK in the WSJT-X settings window.
At this point, you’re almost ready to click the Enable Tx button in WSJT-X, but let’s confirm a couple other things first. Make sure that you see the operating frequency change in WSJT-X when you rotate the TUNE knob on the QMX. If you see the frequency update in WSJT-X as you change the frequency on the QMX, you’re in excellent shape. The last thing to do is to slide the Pwr slider all the way to the top of the scale in WSJT-X.
Finally, you are ready to play by clicking the Enable Tx button in WSJT-X. I would also highly recommend that you read the “Transmit status indication during QMX digital transmissions” section of the QMX operating manual because it will help you to understand the Transmit status indicator on your QMX. This is really important for making sure that your QMX is operating properly. With that being said, if you’re sending a signal onto the wire and your QMX shows a solid bar underneath the VFO-A letter on the LCD, then you should be good. If you see a single dot, or a double-dot, then read the manual and fix your problem based on their suggestions.
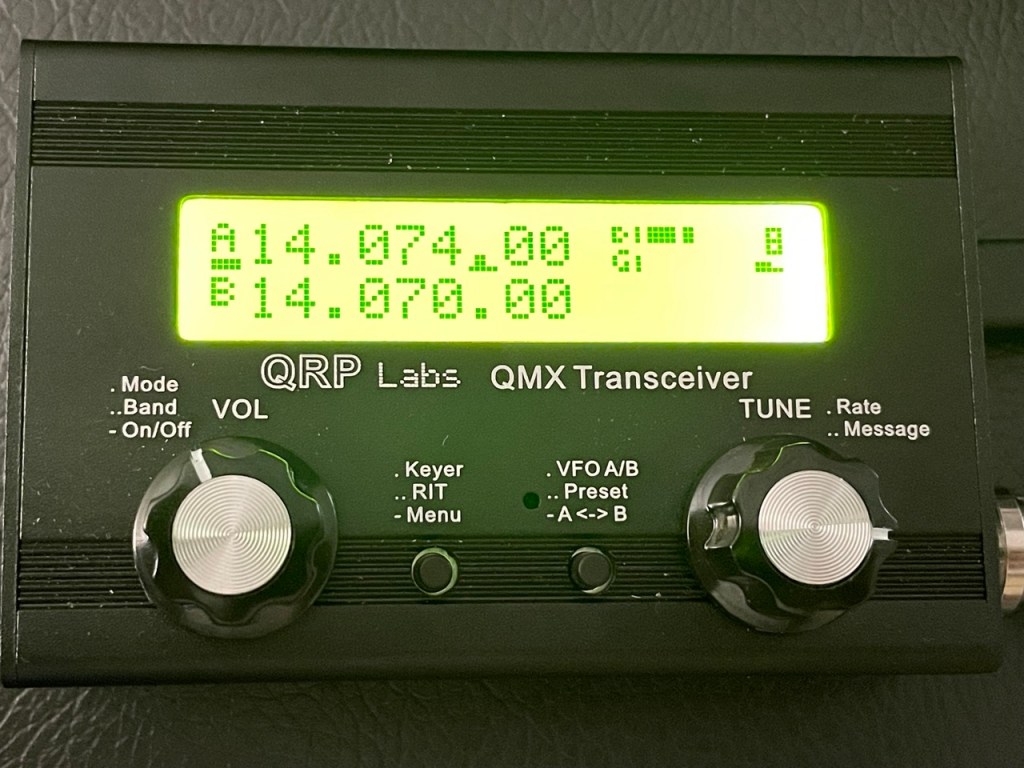
Also useful are the bars to the right of the mode on the LCD screen These indicate Power output (top) and SWR (bottom). Power output is heavily dependent on power supplied to the radio. Three full blocks for the power output would indicate 6W of power. If you don’t see much of anything for the SWR bars, then your antenna is near 1:1.
My QMX in transmit mode with 12V input power supplied shows a power output of around 4 to 5 Watts. My antenna is tuned to about a 1.07:1 match for the 20-meter FT8 calling frequency.
When supplying the QMX with 9V of power, you will notice that the power output graph shows a slightly lower reading, probably around 3 Watts or so.
Have fun and try out some of the other HF digital modes as well. The QMX is capable of operating single-tone FSK modes, so you’re not confined to just FT8. Explore your options!
Troubleshooting
- If you’re able to decode digital messages in WSJT-X, but you’re not being heard by other operators, systematically start checking things from the antenna back to the transceiver. Check the SWR of your antenna with an analyzer to make sure you’re seeing a 2:1 or better SWR on your operating frequency. High SWR for an antenna system will likely cause your transceiver to automatically lower transmit power to avoid damage to the transceiver. Low power can mean that your signal isn’t reaching anyone who is able to pull it from the noise.
- If your antenna system SWR is within tolerance, but you’re still not able to answer someone’s CQ, send your own CQ message on repeat for a few minutes and see if you end up getting spotted on PSK Reporter. A great way to watch for that is to use HamAlert to trigger a notification when your callsign is spotted. If you do this and you find that you are indeed being spotted, pay mind to the signal report included with the spot. If the number is double-digits in the negative, then your signal was really weak at the spotter’s QTH. You could improve signal strength and range by relocating your antenna. (Side note: HamAlert is a great way to know when your favorite hams are on the air)
- Not all power supplies are created equal. You may have a power bank that is rated for 5V and 1A and think that you’ll be great since you can power on your QMX and receive signals from your antenna with it, but as soon as you hit transmit, your radio shuts down. This could be because the power supply you are using is incapable of providing enough resources to power the radio during transmit. The solution here is to use a better power supply.
- You’ll do yourself a huge favor by reading the QMX operating manual for the firmware version you have installed on your QMX. There is a section within the manual which covers setup for digital mode operation as well as for troubleshooting transmission issues using visual clues on the LCD screen of the radio.
Alright, I think that’s it for now. 73 to you all and good luck with your QMX transceiver.
Matthew, K2MAS
K2MAS.net is not affiliated with any of the sites or products listed in this article. All opinions are the author’s own.
As a member of Amazon’s Associate program, I earn a small commission on qualifying purchases made through referrals. This helps offset the costs of hosting this website and are greatly appreciated.
